Monday, 13 August 2012

Legally Ginger!!

Hi There!

I've spent the last few weeks knitting a secret project for my friend who has just finished Law College, and is finally qualified. I decided to try and get her a present at first, a Solicitor Barbie, in a Legally Blonde style, but as you can imagine an intelligent barbie doll is kind of impossible to find. So I decided to knit her a mini me solicitor doll, Legally Ginger.
I received two of these knitted mini me's as a present on my wedding day, they were a complete surprise and were a present off a very talented knitter. I loved my knitted Bride and Groom who looked just like us and it gave me the idea that I could try and make something like that for my friend, something she would hopefully like and keep, and would be a complete surprise.

So it started with a book I bought ages ago on a whim when I started knitting: it's called 'Knitted Icons' by Carol Meldrum and it is used to make mini celebrities like Marilyn Monroe and Britney Spears. I've never had enough courage to attempt one of these, till now but it is very simple. Which shows how you shouldn't judge a book by its cover. You make a basic figure and then dress it into the celebrity of your choice. So I used the book to make the basic body type. Using 4mm needles and 4mm wool in a peach colour I created... a very basic woolen... naked person. This is made by using stocking stitch to create the body, you make 2 oval pieces and sew them together down the sides, then you make the legs and arms by knitting long tubes,and stitch them onto the body. For the head you make 2 oval pieces which is then sewn together. As usual the stuffing was the hard part and I used pillow stuffing to try and create the figure and you always need more stuffing then you first imagine. The one down side to the doll was the legs, which I thought were a little bit too long so I put them higher up on the doll then the pattern said.


Next came the hair, and for this I used, believe it or not a pattern from Cher's hair. You make a round knitted piece and then attach the hair using the fringe technique I mastered with the marble rug from earlier, by cutting strands and connecting them using a crochet hook. For this I used orange wool in a size 4mm.
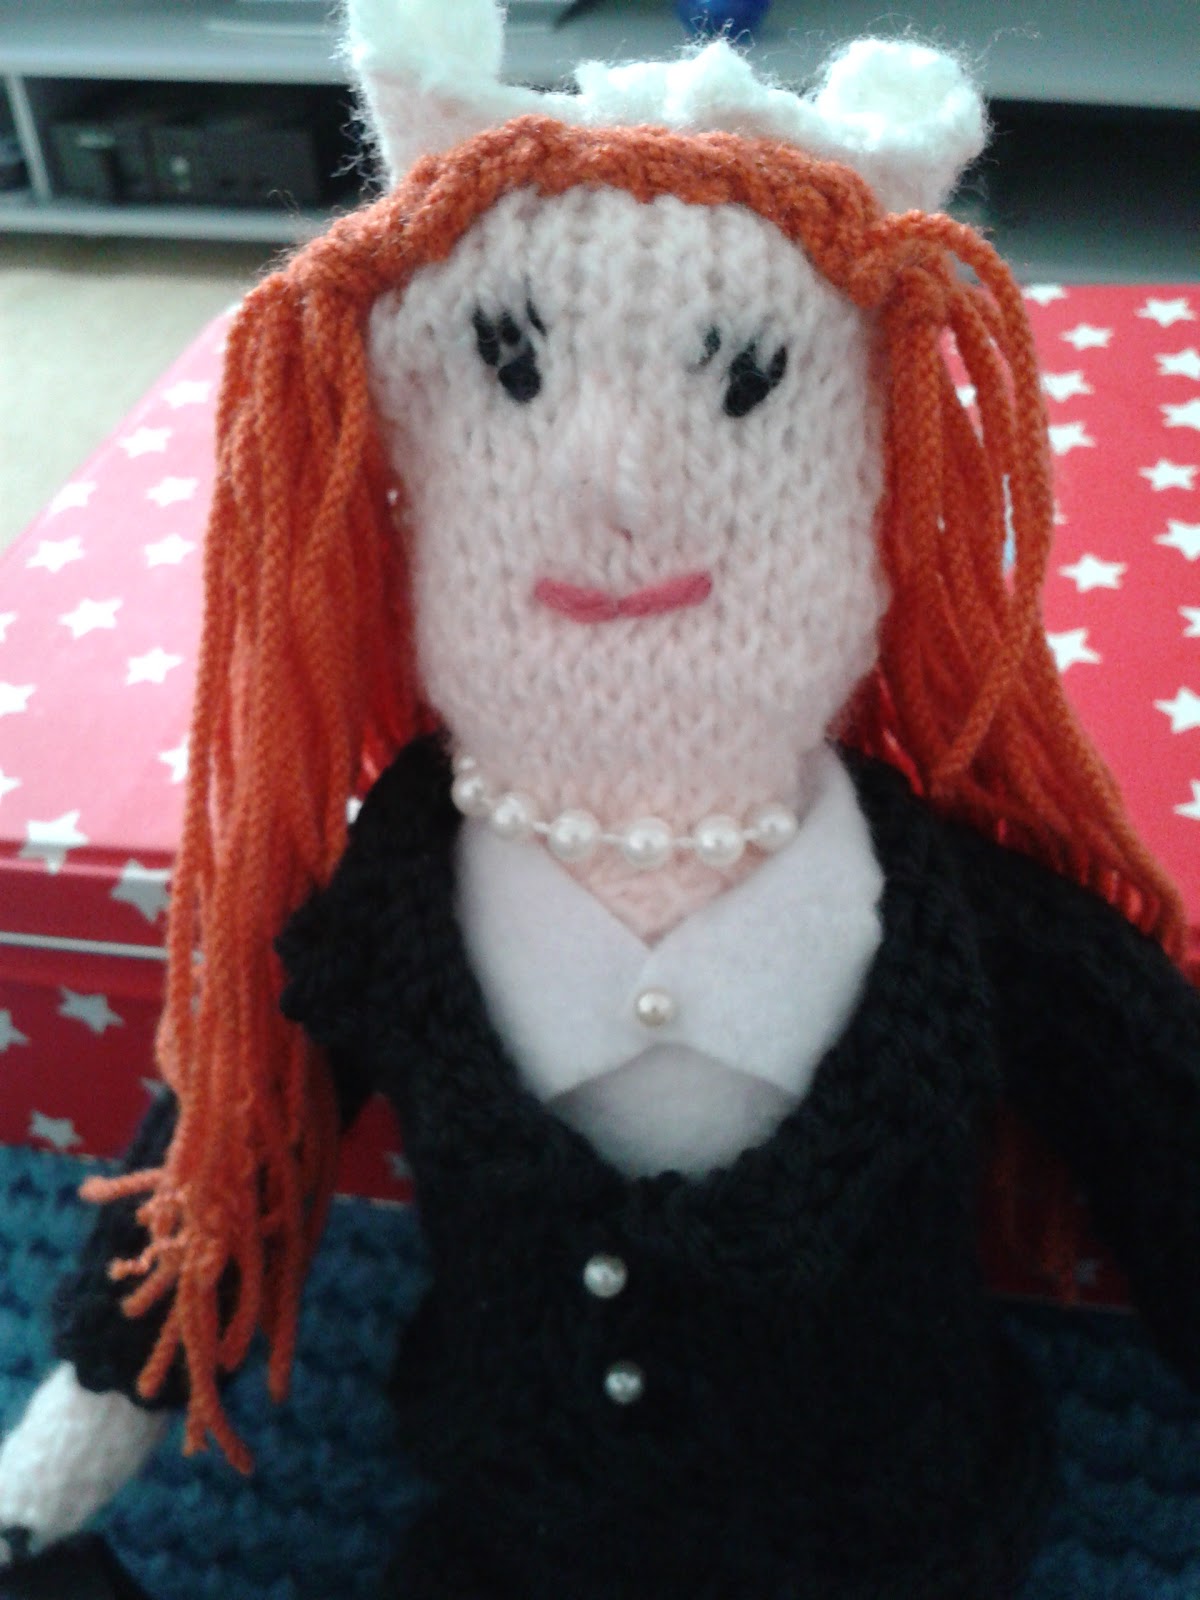


I also made the face at this point by just stitching the mouth on in a pink smile and making french knots in black to make the eyes and a stitched tiny little eyelashes above the knots. I made the face at this point because the stitches are pulled through the top of the head. The nose was made by sewing into the face with the skin coloured wool. Then using white felt, I got out of a children's crafting set cut out collars and shirt front, then using pearl pins created earrings and a button to hold the shirt together.


I have to say however, that I was disappointed with the clothes available in Carol Meldrum's book, hardly any of them are knitted and are made out of fabric or felt, and if you are really bad at sewing like I am it didn't appeal to me to design my own suit. So I turned to the talented lady who made my bride and groom and she gave me her secret: her copy of the 'Knit your own Royal Wedding' by Fiona Goble. This book was released around the royal wedding last March and has patterns for every single royal family member, but most importantly patterns for knitted suits. I particularly wanted to knit a suit jacket so used the pattern for the lounge suit. It's quite simply one piece wrapped around with some increasing and decreasing on the front to make the lapels. I knitted this with 2 3/4 Black arran wool, on my favourite 4 mm needles. I invented the pencil skirt myself by knitting one piece in stocking stitch and wrapping it onto the body to make a skirt the binded off edge was left at the bottom of the skirt to make a slight frilled edge, and a left a split at the back to create a real pencil skirt.

Trial and error was a large part of this project, I made a few different shoes until  I got the size right. Using the pattern for the Queen's shoes I made these in red, my friend's favourite colour and made tiny little bows to stick on the front. The easiest part of this project was the barrister wig, which was actually the Queen's hair stitched on top of Cher's hair. (I never thought I would say that sentence!) To finish the design I made a very basic briefcase out of black felt, and gave the doll a pearl necklace from a string of dress pearls off my actual wedding cake which I had kept and use pearl pins for buttons on the jacket.
I was happy with the final doll, It was challenge to make some very small knits and very intricate decorations, and I had to concentrate a lot to make sure I kept up with the pattern. I do think my gift looked a lot like its owner in the end and for my first ever doll I'm happy with it. I will never think my patterns are perfect, but yes it was a good project, and everyone should be afraid of when the mini me will emerge in the future.

Lots of Love,
Bomo Knitting XX


Monday, 16 July 2012

Marble Carpet


Hi There,

I have spent the last 6 weeks on a bit of a project. I decided to knit...a...carpet! It has been the longest project I have done and probably the biggest thing I have ever knitted but I have truly truly enjoyed it.

I found the pattern for the carpet in a file of patterns that were donated to me through a mutual friend. These patterns were collected by a very organised woman through a weekly magazine and she has built two massive files just full of knitting patterns and tips and techniques. The magazine was run last year and was a weekly print that gave away free wool, needles and DVDs and could be collected into files. I feel really lucky to have these huge files for free without doing any of the collecting or filing myself. Anyway within these files was a pattern for a number of rugs and carpets, as well as knitted place mats and cushions. The rug I chose was a Fringed Runner Rug knitted in Basket Stitch.

The brilliant thing about this rug is that it is really simple and repetitive so you can relax with it and get a good rhythm going. One of the techniques for this rug that I haven't used before was to use 2 balls of yarn at once, the file calls it double yarn, but I call it 'twining' as you are literally twining the two balls of yarn together to make a stronger more durable finished piece. The key however is to keep the balls of yarn and the threads separate as you can end up tangling the yarn together and I got myself into a few knots.

For the carpet I used Marble Chunky Wool in size 6 with size 6 needles. The wool comes in 200g balls. The pattern asks for 450g but I used 400g, and a bit extra for the fringing. I loved this wool, it was such an array of colours from bight pink to reds, browns and oranges. As I was 'twining' it anyway it was quite a good choice of colours as they all mixed together and almost self striped, so it made a lovely marbled effect 


The Basket Stitch knit is made by alternating 2 Purl stitches and 2 Knit stitches, and then using Knit rows and Purl rows in between. It's written like this:
1) Knit to end of row
2) K2, purl to the last 2 sts, K2
3) K4, *P2 K2 rep from * to last 2 sts and K2
4) K2, *P2 K2 rep from * to last 2 sts and K2
5/6) same as rows 1 and 2
7) K2, *P2 K2 rep from * to last 2 sts and K2
8) K4, *P2 K2 rep from * to last 2 sts and K2
You end up with a knitted border around the rug and an almost patchwork design with raised and smooth squares in a basket weave pattern.

Then you can add the fringe which I haven't done before (successfully.) So I used this video I found on You Tube http://www.youtube.com/watch?v=GpJTKwwHbIs. You Tube is really good for finding little videos like this as other knitters pass on their knowledge. You can also get great ideas for new projects off here too.

For the fringe you wind the yarn around a length of cardboard, the length you need and then cut it into equal pieces, then using a crochet hook, you guide the wool through a section of the carpet (or knitted thing) and then simple knot and tie. You can then trim this to get the length you need but for this rug I left the fringe long. 


I'm really pleased with my final project in all it cost just under £15.00, which I suppose you could spend in Ikea on a similar carpet, but mine means a lot to me because it's in my new house and it's something I made that I can keep and that I'm proud of. I plan  to make more probably in different designs for different bedrooms, hall ways or bathrooms and using different stitches. The only drawback with items like this is the amount of time you have to spend on it. If you would like to 'commission' a rug of your own please let me know and I would be happy to make you a piece of knitted art for your home as well, if not just admire mine!!


Lots of Love,


BoMo Knitting

Sunday, 1 July 2012

Elephant in the Room

Hi there

There's something in the air at the moment. Its baby central. The past few months I have been knitting gifts ranging from tiny little newborn baby bootees to little jumpered bears. Both patterns I will reveal in time as they are very simple and fulfilling, but the last two weeks its been all about my knitted elephant.

A good friend of mine's sister is having a baby in two very short weeks and has a jungle themed nursery as like many parents they decided to keep the sex of the baby a surprise. This does pose a challenge when choosing your yarn. One of the lovely things about knitting for babies is the beautifully soft wool you can buy in pale pastel colours. Lemon, lavender, baby blue and pink and aqua, as well as white of course are all perfect for baby presents. If you do know the sex of course you can go for the traditional pink or blue, or you can use unisex bright primary colours like reds, blues, greens and bright yellow for a retro Cath Kidston inspired look.As I didn't know the sex of this little one I went for the aqua and the lemon.


This design was a challenge it was one of the largest toys I've made and was made up of lots of little sections. The elephant was made up of stocking stitch which can be fiddly on finer yarn. To stocking stitch you knit one row and purl the next, moving the yarn to the front of the kneedles and back for the knitted row. I used 4.5 size needles simply because they're a needle I have neglected to use and are of longer length to fit all the stitches on as most of the rows were in their fifties.

I did change the pattern in the end I think it is always good to put your own stamp on something. The pattern is one designed by a very talented knitter called Laura Long. She's the writer of a number of knitting books called 'Knitted Toy Tales' which include wild animals as well as fairy tale characters. The elephant pattern is called 'Eddie the Elephant' and I found in a free booklet from a knitting magazine 'Knit Now'. The pattern at first looked difficult but once I found my rhythm and got used to the wool was relatively simple. I really do recommend Laura Long books and patterns, I hope to make an Owl and the Pussycat one day as well as the pea green boat!


As I said I did change the pattern, the pattern in the book asks for material to be sewn in for the ears and feet but I used a lemon shimmer wool. I also used basic black shirt buttons for eyes as I need to work on my embroidery skills. Also as I am yet to conquer crochet I knitted the tail in garter stitch instead of a chain which I think worked just as well. The trickiest bit came to the stuffing. You always need twice as much stuffing as you first think so whatever you think times it by 2 or even 4. For this I used an old clean pillow and tried to make the body as round as possible. Another tricky bit was stuffing and attaching the tusks. My first tusk was too large and they had to be symmetrical. I am a perfectionist so all the legs were symmetrical also. I finished off the whole elephant with a lemon silk ribbon from John Lewis.


I really enjoyed making  the elephant for the new baby, it took around 2 weeks in all. Spending my evenings making legs was very soothing. I really try to put as much love into my gifts as I can and hope one day to see my elephant one eyed, filthy and well loved by its tiny owner. After all toys are meant to be played with and loved.


Lot's of love, 
BoMo Knitting


Monday, 11 June 2012

Jubilee Bunting!!

Hello fellow knitters,

For the past few weeks the whole of Britain have become obsessed with red, white and blue and Jubilee fever has swept across the land. Apart from the lovely four days off we all received, the street parties, and of course the Queen, people also went a bit mad with bunting. This inspired to make my own bunting, and by make I of course mean knit!

Knitted bunting is quite a fashionable and kitsch thing to do and takes you back to the old times gone by where communities worked together and women wore house coats to do the cleaning. It is such an easy and colourful way to make a statement, get people knitting and contributing together and showcasing your skills and different yarns.


But I digress, knitted bunting is one of the first patterns I learnt when I first began knitting and it is a brilliantly simple way of learning to increase a row. 

First of all the pattern: 
You complete the bunting in Garter stitch (or knit stitch), the reason you do this is because the Garter stitch is a sturdy one that can hold a shape like this. If you used Stocking Stitch it would curl at the ends, however you could use stocking stitch for the majority but would have to border the flag with Garter or Moss stitch to make sure it keeps its shape.

You will need:
Kneedles size 4
Size 4 wool in any colour you like, I chose red, white and blue (of course!)
Ribbon as long as you need it
Sewing needle and thread
Decorative items- any buttons, sequins, ribbons you have lying around.

Pattern:
1) CO 3 Sts 
2) Knit 2 rows
3) increase the first and last stitch of row 3 ( to get 5 stitches)
repeat steps 2 and 3 until you have the size of bunting required, I aim for 29-31 depending on the wool.

See, told you it was easy I can make a bunting flag in about 1 hour- 90 minutes. Once you have the first few rows down you can move easily between each rows increasing every third row, and with it being a knit stitch it is easy to gain speed.

Once your triangles are finished you can attach them to ribbon using you sewing needle in a running stitch, I also then sew a stitch into the middle of the flag to the ribbon for extra security. Then decorate them, or go bare, I used buttons, beads, and ( very basic) embroidery and a string of pearls I had kept off my wedding cake (never through away anything decorative it will always come in handy!).

I made them as a gift for my Mother for her Jubilee party and I have to admit they did look pretty good.


Here is my jubilee bunting, I've used red, white and blue for the jubilee theme, and attached it to silk red polka dot ribbon. I attached a string of pearls to one (for the Queen), a ribbon rossette, buttons and an embroidered crown. The rosette worked really well and I will show you how to make a rose out of ribbon as it is such a quick and easy way to decorate knitted gifts.


Bunting can be used for so many things, imagine it as decoration at Christmas in red and green with gold motifs, or for a baby's room with their name written on it (for that you would have to use stocking stitch). They're also a great gift for birthdays and parties.
I'm mad about bunting! nearly as much as I am about knitting!!!

Happy Knitting!!


Love, 
BoMo Knitting

Sunday, 20 May 2012

BoMo Knitting

Dear future knitter:

I have spent my life telling people that I'm one of those creative arty types without actually having or doing anything to show for it or any actual artistic talent. Last September I had a hit a point in my life when I had finished years and years of education and was looking for the all important job. I was at a low point, and then suddenly came across knitting lessons for beginners in my local area, and went along. I bought some cheap plastic 6mm needles and some pink yarn and began with casting on and the garter stitch and within a few lessons I was suddenly clacking away like an old pro.

I had spent my childhood at my grandmother's in Scotland and watching her knitting my sister and I, toys and clothes, and although I was amazed by her talent I never asked her to teach me, just to make me things, such as my beloved knitted Bagpuss and Paddington Bear. Sadly, she passed away before she could pass on her gifts. Knitting for me came into my life very quickly, that Christmas I made Christmas presents for all the family and suddenly felt a lot closer to my Grandmother and my family past. Also it is the most fun I have ever had, and suddenly I had a hobby and a creative outlet for years of wanting one.

So I have spent the last few months learning new stitching techniques, collecting wool, books, needles, storage boxes and making presents for people. I rarely make anything for myself, the joy is seeing someone else enjoying a home made present, marveling at your rows and rows of tiny loops and learning the new techniques for myself. The other fun section is the shopping. I can spend hours in knitting and fabric shops staring at a million colours and textures of yarn and picturing what it could be woven and tugged into.

I am a believer that anyone and everyone can become a knitter, and that the first steps is to pick up a set of needles and get going. You Tube is a brilliant resource for knitting, I learnt a lot of my skills from a basic video and the tips off other crafty knitters.

It is now my dream to build this love of wool, into a future for myself, and it all begins here with my little blog and BoMo Knitting. Which is a word for the type of knitter I am and the type of knitters coming into the woolly limelight, Bohemian-Modern Knitting.

I will show you what I'm working on, what hasn't worked, what I'm getting requested to make, my failures and triumphs and I will record them all here in the hope that someday my dreams of knitting full time will come true! needles crossed.

Happy Knitting,

Love
BoMo Knitting